Posts

Showing posts from September, 2013

Spring AOP - Part II

For Part -I, refer blog: Spring AOP-Part I Let me give a simple example of AOP to add logging service. Pom.xml <dependency> <groupId>cglib</groupId> <artifactId>cglib</artifactId> <version>2.2</version> </dependency> <dependency> <groupId>org.aspectj</groupId> <artifactId>aspectjweaver</artifactId> <version>1.6.11</version> </dependency> <dependency> <groupId>org.aspectj</groupId> <artifactId>aspectjrt</artifactId> <version>1.6.8</version> </dependency> <!-- logging --> <dependency> <groupId>org.slf4j</groupId> <artifactId>slf4j-api</artifactId> <version>1.7.5</version> </dependency> <dependency> <groupId>org.slf4j</groupId> <artifactId>jcl-over-slf4j</artifactId> <version>1.7.5</ver
Spring AOP - Part I

In this blog I'm going to write about AOP using Spring.  Overview: AOP which stands for Aspect Oriented Programming aims at separating out cross cutting concerns from the normal programming logic. This makes way for cleaner application code can focus on business logic and the other concerns like logging, security etc will be handled by the aspects. Illustration: To give a perspective of how AOP works, let us consider the following example: Let us say, in a big city, there are no proper sign boards. So the city Mayor decides to take up a project to install sign boards. This project is like a cross cutting concern in some way.  The city corporation will define certain rules to install the sign boards.  Sign board rules: A sign board indicating 'school nearby' should be placed 5 meters from the school in both directions.  A sign board indicating a sharp curve should be placed 5 meters before the curve.  A sign board 'Thank you. Visit again' should

Proxy Pattern

In this blog, I'm going to write about Proxy pattern and it's applications. Definition: Proxy is a Structural design pattern which works 'on behalf of' or 'in place of' another object in order to access the later. Here proxy objects are used to perform the work on somebody's behalf. We will use proxy objects in the following scenarios: Lot of boilerplate code is required in order to invoke the real object. The access to the real object is limited and all the access needs to go through the proxy. The real object is a remote object Illustration: Let us take an example. Lets say there is a King who lives in a palace and he has all kind of antique jewelry, paintings etc. John has a hobby of collecting antique items and he wants to purchase some antique items from the king.  But the king will not part with his antique pieces so easily. He misses his good old glorious days in this modern era and hence the person who wants to purchase h

Spring Webflow Code example - Part IV

Image
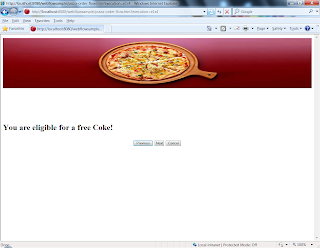
For previous parts: For Part-I click on:  Spring Webflow Code example - Part I For Part-II click on:  Spring Webflow Code example - Part II For Part-II click on:  Spring Webflow Code example - Part  III Lets create the third page which is to provide a complementary drinks, if the user has selected 'Indian Spicy Pizza'.  Now since this page needs to be shown conditionally, we need to make use of 'action-state' element. Using this, we can evaluate a condition and then make the transition accordingly. In the view-state for 'selectPizza', insert the transition for 'next' to a state 'complementaryDrinks'. This will actually be a action state as shown below. Note the action state 'complementaryDrinks' will invoke a method hasComplementaryDrinks() to determine the transition. Modify the pizza-order-flow.xml  as below: <view-state id="selectPizza" model="viewScope.newpizza"> <on-render>

Spring Webflow Code example - Part III

Image
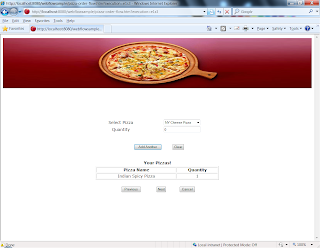
For Part-I click on:  Spring Webflow Code example - Part I For Part-II click on:  Spring Webflow Code example - Part II Let's create the second page 'Select Pizza'. In this page, we will show a drop down of available pizzas. This page will have buttons 'Add', 'clear' in addition to navigation buttons 'Next', 'Previous', 'Cancel'. Once the user has selected a pizza, the user can click on 'Add' button to add the pizza to the user's cart.  The user can use the 'Clear' button to clear the cart, if he wants to start all over again. Controller changes: In order to initialize the collection for this drop down, we will create a new method 'initPizzaList' in the controller. We also need a method to initialize the Pizza object which will be the model for the jsp. Further, we need a controller method 'addPizza' to update the Order model with the pizzas added. We also need a 'clearPizzas'

Spring Webflow Code example - Part II

Image
For Part-I click on: Spring Webflow Code example - Part I In order to invoke the webflow, let's create a link 'Create Order' in index.jsp. The link would refer to the path of the webflow xml. index.jsp <a href="http://www.blogger.com/webflowsample/pizza-order-flow.htm">Create Order</a> Let's try to create the first Page "Customer details". Before landing on this page, we need to instantiate the model objects in controller. We will be adding new method to the controller for this. Validation: In the customer details page, let us try to validate 'First Name' for  mandatory field. Let us create a method to validate the customer in the controller. The method should follow a naming convention 'validateXXX' where XXX refers to the field name. Changes to controller: @Controller public class PizzaOrderController { public Order createOrder(){ Order order = new Order();

Spring Webflow Code example - Part I

This blog shows how to develop a Spring Webflow application having integration with Spring MVC. Spring WebFlow allows us to create a UI workflow with a series of page navigation and abiltity to navigate back and forth. It also provides a context to work with in addition to many other features. Overview: We will be creating a flow to order pizza with the following navigation pages.  The first page - Enter customer details The second page - Select pizza Review Order & submit Order confirmation Now, in the second page, you get a few options to select the pizza you want. If the customer selects 'Indian Spicy Pizza', then we will offer free coke (The pizza provider is kind enough to provide some relief to customers after eating spicy stuff. :)  ) So, after the second page, if the customer selects 'Indian Spicy Pizza', then a page showing complimentary coke is displayed. This is conditional navigation. After submitting the order in the third page,

Spring Tips: Introduction

Image
Spring framework is amazingly so vast and having tons of features that how much ever you learn, it would appear to be just a tip of the iceberg. This series of blogs titled "Spring Tip" aims to provide Spring  features in a  small and concise manner without over diluting the content. These blogs will have links to next and previous tips so that you can navigate back and forth and savor each tip. :) PS: Special thanks to Venu for designing the buttons.

Building UI using Spring MVC - Part II

In continuation of my previous blog , in this blog we will see how session is handled and little more about spring tags. Session Handling: Spring MVC provides an annotation '@SessionAttributes' which will identify objects which need to be put in session. Spring container will take care of adding and updating these objects into the Session. For eg., @SessionAttributes("user") public class UserController{ .... } The above annotation will inform the container that the object identified by "user" attribute in the Model will be stored in session. Further, in the controller method, we will create a ModelAndView object as usual and add the User object to it.  The point to note here is that: Before a controller method is invoked, the sessionAttribute values are retrieved from session and the model object is updated. After controller method returns, the updated model values (only those annotated with SessionAttributes) are put back in session.

Building UI using Spring MVC - Part I

In my previous blog , I wrote about implementing Restful services using Spring MVC. In this blog, we will see how to build a UI using Spring MVC. Let us try to implement a UI to create a User. Again the intent is to show to use Spring MVC and hence we can reuse most of the artifacts from previous blog , except for the controller. Create User URI: Before landing on the jsp for creating a User, we will need some preprocessing to happen, which will include creation of User model and also model for drop downs if any (let us say a drop down to show Countries). Now, there are two approaches to build the URI for create form as explained below. 1. Same URI for preprocesing as well as actual create. In this approach, the same URI let us say '/example/users/user/new' will be used for preprocessing and user creation. The only difference being, for preprocessing we will use GET and for user creation (upon form submission) we will use POST. @RequestMapping(value=&qu